can all laptops connect to 5g
Links related to "can all laptops connect to 5g"
Our Best LTE & 5G Laptops with Cellular Data Business
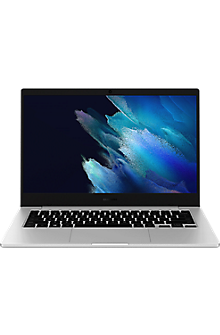
On the most reliable 5G network in America. Connected laptops powered by Verizon offer powerful performance, lightning-fast 5G connectivity, and enterprise-grade security features. Connect, collaborate, and work smarter with lightning-fast speeds and reliable connectivity. Empower your employees to work from anywhere. Boost productivity and collaboration while maintaining seamless connectivity. Protect your business with enterprise-grade security features. Keep your data and devices safe from cyber threats. Grow your business with a flexible and scalable mobile solution. Verizon's connected laptops can meet the needs of businesses of all sizes. Meet the ThinkPad X13s— built on the Snapdragon® 8cx Gen 3 Compute Platform, and built for the modern user. Designed with versatility for any business with intelligent performance, outstanding screen experience and built-in security and privacy options. Introducing the Samsung Galaxy Book Go 5G, a laptop designed to help you work and play smarter. Powered by Qualcomm® Snapdragon™. Experience the potential of your connected laptop by connecting it to the network America relies on. Purchase from Verizon, from our partner, or your trusted vendor—then activate with us today. A successful digital workplace needs dependable, fast internet services. Verizon has the speed and reliability your business requires. years managing complex networks worldwide. Fortune 500 companies served. of U.S. population covered by 4G LTE.
Learn moreBasics of 5G Technology and 5G Networks
We've got some great deals going on right now exclusively for our online customers... chat now to hear more! 5G Ultra Wideband. Now available to more businesses in more places than ever before. 5G Ultra Wideband is part of the 5G network, which contains a broad spectrum range. 5G Ultra Wideband now includes both C-Band and mmWave Ultra Wideband spectrums for broader coverage with strong performance. Our fast, reliable 5G Ultra Wideband can power more organizations in more places. You need the right , the right software and the right plan. Ultra-fast, ultra-powerful. Now in more and more places to power your business, organization or agency like never before.*,It can give your business or agency fast wireless internet even when lots of devices are connected. Work and collaborate without being slowed down by everybody else when connected. Say goodbye to slow speeds and unsecured networks with a connection that helps keep work flowing. So your downloads take a fraction of the time – get video in minutes, or documents in seconds. Collaborate in real time, and video conference without Wi-Fi – and fewer frozen faces. iPhone 13 iPhone 13 mini iPhone 13 Pro iPhone 13 Pro Max iPhone 12 iPhone 12 mini iPhone 12 Pro iPhone 12 Pro Max iPad miniGalaxy S21 Galaxy S21+ 5G Galaxy S21 Ultra 5G Galaxy A42 5G Galaxy Tab S7 5G Galaxy Z Fold3 5G Galaxy Z Flip3 5G Galaxy Book Go 5GPlus many more 5G Ultra Wideband devices to come. Pixel 6 Pixel 6 Proone 5G UW ace edge 5G UWTCL TAB Pro 5GMyra 5G Speed 5GBusiness Unlimited Plus 2.0 Smartphone Business Unlimited Pro 2.0 Smartphone Business Unlimited Plus 1.0 Smartphone Business Unlimited Pro 1.0 Smartphone Business Unlimited Tablet Pro plan,5G network access isn't included with grandfathered, custom or non-standard plans, but you can add 5G access to your compatible plan for $10/month to access our 5G Ultra Wideband network when you're in an Ultra Wideband coverage area. Business Unlimited Data Device plan—Jetpack and Laptop Flexible Business plan—Smartphone Flexible Business plan—Jetpack the New Verizon Plan for Business—Smartphone the New Verizon Plan for Business—Jetpack Business Unlimited Essential Smartphone $35 Business Unlimited Smartphone $45 Business Unlimited Plus Smartphone $50 Business Unlimited Essential Tablet $30 Business Unlimited Tablet $45Non-standard versions of Business Unlimited Plus and Pro plans will include 5G UWB. For all other non-standard plans, please check with your sales rep or log in to MyBusiness. With Verizon 5G, businesses have even more opportunities to innovate and transform. From our extensive investments in fiber to our broadening spectrum holdings, our 5G solutions are built right. 5G represents the fifth generation of cellular mobile communications. But it's more than just an update of what's come before. It's a transformative change to the way cellular networks operate—one that is designed to connect more than ever before, including people, machines, objects and devices. C-Band is referred to as "mid-band" spectrum because it sits between low-band spectrum, like Verizon's 700 MHz, and high-band spectrum, like our mmWave 28 GHz and 39 GHz. This band is widely used across the globe, with a mature ecosystem of chipsets, devices and network infrastructure. 5G represents the fifth generation of cellular mobile communications. But it's more than just an update of what's come before. It's a transformative change to the way cellular networks operate—one that is designed to connect more than ever before, including people, machines, objects and devices. Over 2022 and 2023, coverage is expected to increase to more than 175 million people in the 46 markets. By 2024 and beyond, when the remaining C-Band is cleared, more than 250 million people are expected to have access to Verizon's 5G Ultra Wideband service on C-Band spectrum. 5G Business internet complements the full suite of Verizon Business tools and offerings, including OneTalk voice communications, advanced security and other business services. By using a high-powered fixed 5G receiver, business customers can access the broadband speeds they need with the reliability from Verizon they have come to expect. AR-enabled collaboration: In service, architecture, manufacturing, healthcare, public safety, education and construction industries, job site visits and collaboration sessions can be costly and time-consuming. Virtual inspections or collaboration using augmented reality (AR) and virtual reality (VR) capabilities could save time and support events, learning and collaboration. We are providing High Speed Broadband connectivity to more suburban and rural markets (100 Mbps). Given today's COVID environment, this can help continue to close the digital divide with student learning. Integrating in-store and online shopping with AR/VR, QR or even integrated digital experiences in store. Retailers can deliver exceptional customer experiences by improving access to product information and availability. C-Band is referred to as "mid-band" spectrum because it sits between low-band spectrum, like Verizon's 700 MHz, and high-band spectrum, like our mmWave 28 GHz and 39 GHz. This band is widely used across the globe, with a mature ecosystem of chipsets, devices and network infrastructure. Verizon was the first in the world to launch a 5G mobile network, and since then we've deployed millimeter-wave (mmWave)-based 5G Ultra Wideband service in parts of more than 80 cities. In March 2021 Verizon invested $52.9 billion in new C-Band spectrum, winning between 140 and 200 MHz of C-Band—more than doubling our existing mid-band spectrum holdings. With C-Band, it's not only about the bandwidth, it's also the ability to expand our Ultra Wideband coverage to a larger population of both consumers and businesses. More than 70% of the 5G devices in the hands of customers and constituents today are C-Band compatible. Every iPhone® 12 model is C-Band compatible. The Samsung Galaxy® S21 series and Google Pixel™ 5 are also compatible. Going forward, all new 5G handsets Verizon brings to market to postpaid customers will be C-Band compatible, with more than 20 C-Band compatible devices offered today. In 2020, Verizon partnered with AWS and immediately enabled AWS's 1 million plus developer community to create applications for the nearly 170 million end-devices across Verizon's 4G and 5G Nationwide networks at the edge. Developers today are building use cases spanning a wide array of commercial applications—all through an easy on-ramp in the AWS portal where they can move their workloads to the edge of our network. This collaboration enables Verizon Business to be a key participant in this growing opportunity with 5G UW coverage accelerating our reach and time to market. Whether you need to be more agile and respond faster to changing dynamics or enhance how technology is deployed and used across your agency—Verizon 5G can help transform your organization. Verizon 5G can enable faster video, help your agency better serve your constituents and boost efficiency and productivity by leveraging near-real time analytics. Additionally, 5G can provide faster speeds to enhance situational awareness, harness massive amounts of data and make it actionable, and provide secure, lightning-fast access to mission-critical data. To learn more about how Verizon can help support your organization, call 844.819.4962. Our 4G LTE network covers more than 2.68 million square miles, 327 million people and over 99% of the U.S. population.* And soon, we'll offer more 5G Ultra Wideband coverage. Existing customers, to your business account or . For public sector, call These cookies are necessary for the website to function and cannot be switched off in our systems. They are usually only set in response to actions made by you which amount to a request for services, such as setting your privacy preferences, logging in or filling in forms. You can set your browser to block or alert you about these cookies, but some parts of the site will not then work. These cookies do not store any personally identifiable information. These cookies allow us to count visits and traffic sources so we can measure and improve the performance of our site. They help us to know which pages are the most and least popular and see how visitors move around the site. We use both third party and first party cookies for this purpose. All information these cookies collect is aggregated and therefore anonymous. If you do not allow these cookies we will not know when you have visited our site, and will not be able to monitor its performance. These cookies enable the website to provide enhanced functionality and personalisation. They may be set by us or by third party providers whose services we have added to our pages. If you do not allow these cookies then some or all of these services may not function properly. These cookies may be set through our site by Verizon and third parties. They are used to present Verizon advertising on third party sites that you may visit. They do not store directly personal information, but are based on uniquely identifying your browser and internet device. If you do not allow these cookies, you will experience less targeted advertising from Verizon. BackClear Filters,All Consent Allowed
Learn more5G Edge ThingSpace Tutorial
In this tutorial, you connect a CAT-M1 LTE-enabled IoT device to a 5G Edge API server on an Amazon EC2® instance in the Boston Wavelength Zone (us-east-1-wl1-bos-wlz-1). To build this tutorial, you will require a Verizon ThingSpace account for your IoT connectivity plan, the IoT device from our ThingSpace Marketplace, a Raspberry Pi® 4 device and an active Amazon Web Services® (AWS® ) account. First, make sure your AWS account has Wavelength Zones enabled. If you have not submitted your request to get access, please complete the sign-up form . Next, purchase your and ensure that you have a compatible with the latest Raspberry Pi OS (32-bit),After purchasing the Raspberry Pi 4, make sure you have a USB-C charger (i.e. same as MacBook Pro 2017+) to power the device. You will also need a which includes everything you need—including the LTE module— to plug directly onto the Raspberry Pi board,While you wait for shipment, visit the to activate your SIM card with a monthly data plan of your choice. Note: Since you already have a Verizon-certified SIM in your Monarch Go, you will need the and values on the module (see white sticker attached to Monarch Go module),Upon shipment(s) arrival, follow the Raspberry Pi to boot the OS and then attach the Monarch Go Pi Hat to the board. For more information on configuring your board, visit a step-by-step guide from the Avnet team,Plug your SD card into your laptop (you may need an SD-card-to-), and then navigate to the boot directory on the SD card (),Download from the package manager:,sudo apt-get install vim,Create an empty file named SSH in the boot directory of the SD card (vim SSH),Create a new file named which tells the Raspberry Pi how to connect to your Wi-Fi network to enable a headless boot. Be sure to edit the and with your Wi-Fi network name and its corresponding password:,country=US ctrlinterface=DIR=/var/run/wpasupplicant GROUP=netdev updateconfig=1 network={ scanssid=1 ssid=yourwifissid psk=yourwifipassword },Edit the file to change the console universal asynchronous transmitter/receiver (UART) from primary UART to secondary UART (serial1), which the Monarch Go Pi Hat requires. Within that first line, change console=serial0 to . After this step, eject the SD card from your laptop and plug it back into your Raspberry Pi,Use the native ARP protocol () to find the address of your Pi on your local network. Alternatively, you can leverage () to get the IP address if connected to your Wi-Fi network,Upon retrieving the address of your Pi, ssh into the board. Remember to supply the default password of,ssh pi@,Open the Raspberry Pi configuration page,sudo raspi-config,Select Serial 5,At the prompt Would you like a login shell to be accessible over serial? answer,At the prompt Would you like the serial port hardware to be enabled? answer,Select to exit, and to reboot the Raspberry Pi,After rebooting, ssh into your Raspberry Pi as you did earlier. To get started, download the minicom package, which is a text-based modem control and terminal emulator program:Next, configure the general-purpose input/output (GPIO) pins on your board, which adjusts the RTS/CTS signals you need for the Monarch Go to communicate over LTE:,echo 17 > /sys/class/gpio/export echo out > /sys/class/gpio/gpio17/direction echo 0 > /sys/class/gpio/gpio17/value echo 16 > /sys/class/gpio/export echo in > /sys/class/gpio/gpio16/direction,Establish the communication to the modem using minicom:,minicom --device /dev/serial0,Now that you have direct communication to the modem, verify that you can connect to the modem and that the modem can connect to the LTE network. Run the command and you should see an output generated that looks something like this:,+CEREG: 2,1 150B,00539391,7,Exit minicom,To communicate over LTE, you need to enable the point-to-point (PPP) protocol by downloading the package () and adding a few additional files,Add a new file titled with the following text, which creates the PPP network interface connection:,auto ppp0 iface ppp0 inet ppp provider sequans,Next, we need to create a new file named in the /etc/ppp/peers/ folder with the following contents:,/dev/serial0 115200 crtscts -chap pppd by debug defaultroute which pppd dump local lock noauth nodetach noipdefault usepeerdns connect /usr/sbin/chat -t6 -f /etc/chatscripts/connect disconnect /usr/sbin/chat -t6 -f /etc/chatscripts/disconnect,Next, add a new file in the /etc/chatscripts/ directory that provides the AT commands for the connect chatscript. Then, add a new file in the /etc/chatscripts/ directory that provides the AT commands for the connect chatscript:,#connect TIMEOUT 30 ABORT ERROR AT OK AT+CGDATA=PPP,3 CONNECT #disconnect # This is the chat script used to hang up the Sequans Module # \d\d\d+\c,Edit the file and add the line auto ppp0 to the end of the file,To configure ppp0 as the default network, find the IP address of the ppp0 interface. The correct IP address will be the one with the Iface column indicating that it is of type ppp0 (not wlan0),With the IP address of the pp0 interface, add the IP to the default route to your gateway:,sudo route add default gw XXX.XXX.XX.X netstat -rn,Your Raspberry Pi will now connect, by default, to the LTE modem,To communicate to 5G Edge, you'll need to enable a Wavelength Zone in a public subnet within a virtual private cloud (VPC), attach a carrier gateway to the subnet, launch an EC2 instance, allocate a carrier IP address to our EC2 and run a Flask server to accept incoming HTTP traffic. To provision your 5G Edge infrastructure, you'll need the AWS CLI version 2 installed on your local machine. To launch an EC2 instance in a Wavelength Zone of your choice, view this using the CLI,After configuring your infrastructure, ssh into the EC2 instance in the Wavelength Zone and open a new file to accept GET request traffic over the test endpoint:,from flask import Flask, jsonify app=Flask(name) @app.route(/test,methods=[GET]) def getTest(): return Hello from 5G Edge! if name=='main': app.run(host=0.0.0.0),Run the API server and terminate the session:,nohup python api.py &,sudo apt update sudo apt install python3 python import requests r=requests.get(http://,Congratulations, your Hello World! application using ThingSpace and 5G Edge is complete!,These cookies are necessary for the website to function and cannot be switched off in our systems. They are usually only set in response to actions made by you which amount to a request for services, such as setting your privacy preferences, logging in or filling in forms. You can set your browser to block or alert you about these cookies, but some parts of the site will not then work. These cookies do not store any personally identifiable information. These cookies allow us to count visits and traffic sources so we can measure and improve the performance of our site. They help us to know which pages are the most and least popular and see how visitors move around the site. We use both third party and first party cookies for this purpose. All information these cookies collect is aggregated and therefore anonymous. If you do not allow these cookies we will not know when you have visited our site, and will not be able to monitor its performance. These cookies enable the website to provide enhanced functionality and personalisation. They may be set by us or by third party providers whose services we have added to our pages. If you do not allow these cookies then some or all of these services may not function properly. These cookies may be set through our site by Verizon and third parties. They are used to present Verizon advertising on third party sites that you may visit. They do not store directly personal information, but are based on uniquely identifying your browser and internet device. If you do not allow these cookies, you will experience less targeted advertising from Verizon. BackClear Filters,All Consent Allowed
Learn moreQuestions related to "can all laptops connect to 5g"
Press related to "can all laptops connect to 5g"
Verizon Business introduces IoT on 5G Nationwide, new suite of Intelligence features
Verizon Business today announced a potent combination of customer-facing network, hardware and intelligence offerings for Internet of Things (IoT) applications across industries
Verizon Business expands 5G Business Internet to 21 more U.S. cities
Verizon Business today announced that 5G Business Internet, a fixed-wireless connectivity offering for businesses of all sizes, is expanding to 21 new U.S. cities this month.
IBM and Verizon Business to collaborate on 5G and AI solutions at the Enterprise Edge
Verizon and IBM to work together on 5G and MEC co-innovation. The first solutions to be aimed at helping improve industrial quality, availability and performance.
Related Devices

Case Studies related to "can all laptops connect to 5g"
Phoenix Suns pair 5G and MEC for new NBA stadium Business
Find out how the Phoenix Suns transformed the Footprint Center into a Verizon 5G stadium to help optimize their play and analyze game-changing insights.
How Appalachian Pipeline Contractors Connects Construction Job Sites with LTE Business Internet Business
Learn how LTE Business Internet helps Appalachian Pipeline Contractors connect their construction job sites to aid in their construction efforts.
The Benefits of 5G for Businesses with Ronin Designs Business
With the power of 5G, Ronin Designs was able to shift their focus from worrying about file transfers to enhancing their work and focusing on their clients.
Ashburn, Virginia, United States(based on your internet address)